OPERATION.The door is hung from its' toothed drive belt which is supported on a separate mechanism situated behind the rear wing panel. The front of the door is not supported except when latched up or down. The front track controls only the left/right position of the door. That is, the horizontal alignment with the side of the car.
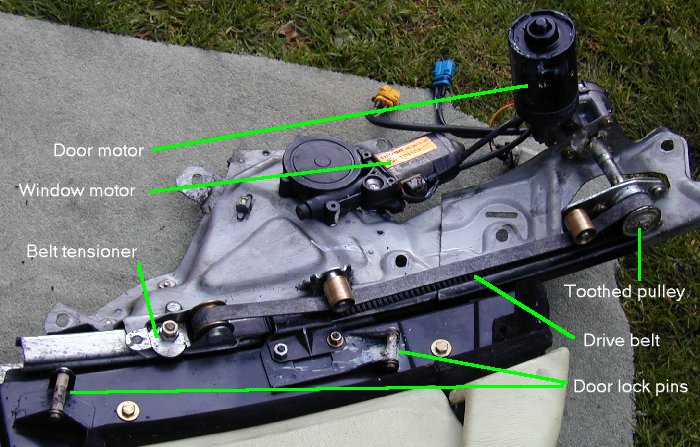
Movement is controlled by the electric motor turning a toothed drive wheel, which lowers or pulls the drive belt. When the door is in the open or close position, it engages with a lock-shaft which turns to operate the door latch, and a microswitch which disconnects power from the motor. The door then rests on the lock-shaft, with no strain on the belt or the motor. The door is hung from the base plate to which all the mechanisms are fixed.
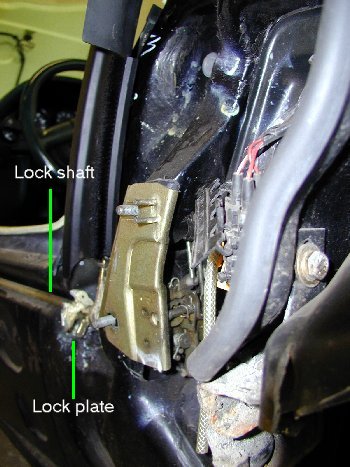
The 'door off' picture shows the lock-shaft which runs forward from the latch mechanism. The 'C' shaped lock-plate is pointing downwards which would be the door down position. As the door lifts, lock pins in the inside edge of the door will engage in the lock-plate and make the shaft rotate, thus operating the latch mechanism and micro switches.Vertical adjustment of the door is only possible by adjusting the the lock-shaft to change the uppermost position. This should only be necessary if the lock-shaft or the latch are changed.The door can only be adjusted horizontally by addition or subtraction of shims from behind the front door track and the door mechanism mounting plate at the rear. This is never normally required, and when built from new, the shim value in MM is painted on the chassis next to each mounting bolt. In the picture above, you can just see a '3' .
Scratches on the face of the door appear when there is a build up of dirt on the inside of the side panel, or if the panel is bent. This can be a permanent bend or temporary, caused by someone leaning on it as the door is operated. Vertical scratches are due to abrasion when raising and lowering the door, horizontal scratches are caused by vibration of the door during door open driving.
DOOR REMOVAL.
With the rear wing and side panels removed.(Body panel removal instructions) First lower the window, and then remove fuses 25 & 26. Unlatch the door by pressing on the door lock, and lower it. Remove black cover plate at rear of door opening. NOTE: Pull up the centre of the plastic expansion rivet to loosen it first.
Disconnect the electrical connections to the door and window motors:
WHITE PLUG - ELECTRIC WINDOWS.
BLUE PLUG - WINDOW POWER MOTOR SUPPLY.
YELLOW PLUG - ELECTRIC DOOR MOTOR SUPPLY.
BLACK PLUG - TWO DOOR MICROSWITCH CONTROL.Loosen all the mounting nuts and allen screws holding the door frame and mechanism onto the chassis (8 in total). Where there are shims and spacers, which may be a collection of washers and C-shaped shims MAKE A NOTE OF ORIGINAL SHIM (SPACERS) SETTINGS WHEN REMOVING. Get a piece of cardboard and mark the location of each bolt, number of shims. When the car was built at the factory, there will be a number painted alongside each mounting, showing the thickness of spacers used. Subsequent mechanical work on the doors may have changed these settings, but if the door worked properly, DO NOTchange the shimming! Now remove all nuts and allen screws.
Check you have disconnected all connectors and nothing will obstruct removal. Take the weight of the door and firmly pull towards you, be aware the door motor is mounted horizontally into a hole within the chassis. Place door face downwards onto a pre-prepared large soft clean thick surface to work on.
Remove door and place face down on working surface - care must be taken to avoid scratching the painted door face.
The belt may not be in the correct place when removed. Malfunction and failure can be preceded by the door belt being misaligned. Note that the door belt is not toothed all round.
Remove old belt. Remove small guide roller which keeps the belt close to the top toothed drive wheel. Unscrew the locknut on the eccentric tensioner at the lower end of the belt. Remove the circlip and axle from the lower roller, removing the roller itself. Undo the clamp nuts and remove the clamp.
Fit new drive belt by installing within guides and rollers before fixing the clamp. Examine the belt to make sure that it is the right way round, and that the toothed part of the belt will only run over the toothed drive pulley. Mount the clamp so that it is over the first tooth of the belt, as it is a mechanical clamp do not over tighten the clamp bolts (6 Nm / 4.3 ft.Lbs). Take up the slack by adjusting the eccentric on the lower pulley. Test run the door by applying 12 volts to the yellow 2 pin plug. The belt must not rub on the sides of the upper or lower rollers. Adjustment is by bending their mounting brackets. These rollers are ground convex, so the belt should ride centrally.
When the door has been re-hung adjust the belt tension. Move door to half-way position, attach a spring scale to the lower tightening eye, and apply a pull of 20Kg / 44Lbs. Adjust eccentric and tighten locknut. You should be able to twist the return part of the belt by only about 45 degrees.
DOOR INSTALLATION.
Easier with 2 pairs of hands, The door will have been removed in the down position. It is best to replace it in the half way position, so that the door does NOT rest on the latch bar whilst being fitted.
Unlock door lock mechanism by pressing on the lock button. Adjust the door on its' mechanism so that approx 150mm of the door guide is projecting from the top of the door.
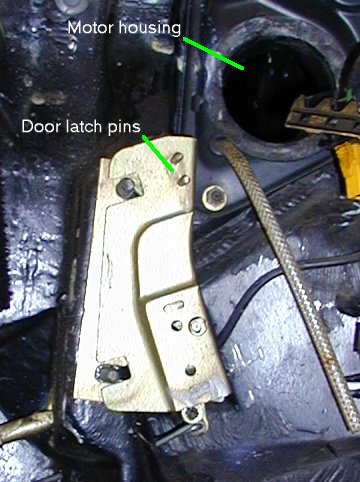
Apply rubber lubricant to the gland around the motor housing aperture in the chassis where the lift motor is to be inserted. Replace spacers(shims) as required on mounting bolts. Lift the door back onto the fixings. Press the latch mechanism (the yellow metal bit under the door frame) forward until the latch pins engage through the base-plate.
Note how the latch has BIG fixing holes for plenty of adjustment.
LATCH ADJUSTMENT
DIFFICULT.This shows where the latch pins are aligned through the base plate. This is about the only latch adjustment possible. Slacken off all base plate retainers, and re-position the latching mechanism (above), and then re-tighten the base plate. On this particular car, best operation of the latching was obtained by making sure that the latch was firmly forward when the door was tightened up.
The door may need vertical alignment. Replace rear wing and secure with only the top screw which holds it over the door lock button. Raise door by hand until the top of the door is aligned with the top of the rear wing. Lift front of door until the gap between the rear of the front wing, and the front of the door is uniform, then tighten bolts and allen screws to secure the base-plate back onto the chassis
Release door by pressing the button, and lower it by hand. Examine the lock shaft to make sure that the door pins have engaged in the down position. Pull interior door release and lift door by hand until it is right up, and the door pins have engaged the lock shaft and rotated it to the locked (up) position. This is best done by looking up from beneath the door. Considerable force will be necessary to ensure that the door is right at the top of its travel, care should be taken not to strain your back!
NOTE that if the lock-shaft or latch haven't been moved then the only adjustment needed should be by the positioning of the door and baseplate with its oversize holes on the mounting studs.
Remove the lower side panel. (see bodywork) Remove fuse 25, unlock the door by pressing the door button and push the door halfway. From inside the car, undo the 4 screws hidden under the top of the door trim working from the front of the car to the back. ( A mirror is a good help with this operation.) There is a 5th screw at the rear of the trim just at your shoulder. This is almost impossible to get at but fortunately the trim has a slotted hole on this one and will allow you to pull the trim in towards the car off the slotted hole.
Insert the fuse, close the door and lower the window. From inside the car just at your shoulder pull back the door trim side panel, this will reveal a small port hole, if you look through it you can see a self tapping screw near the door handle moulding. That is the only fixing at the top of the door skin.
Now open the door and remove the plastic pop rivet type fixings along the bottom edge of the door from the outside. The last fixing is the large flat bolt in the middle of the bottom edge of the door. When this is undone the door skin should flap free.
With the door open lift the door skin out and up to unhook the top edge of the door skin and it should lift clear. When refitting the skin again with the door open place the top left hand corner on to the door frame first and hang the top edge. Replace all bolts. It is wise to practice this a couple of times so that when you get your door painted there is less chance of you damaging your freshly painted skin.
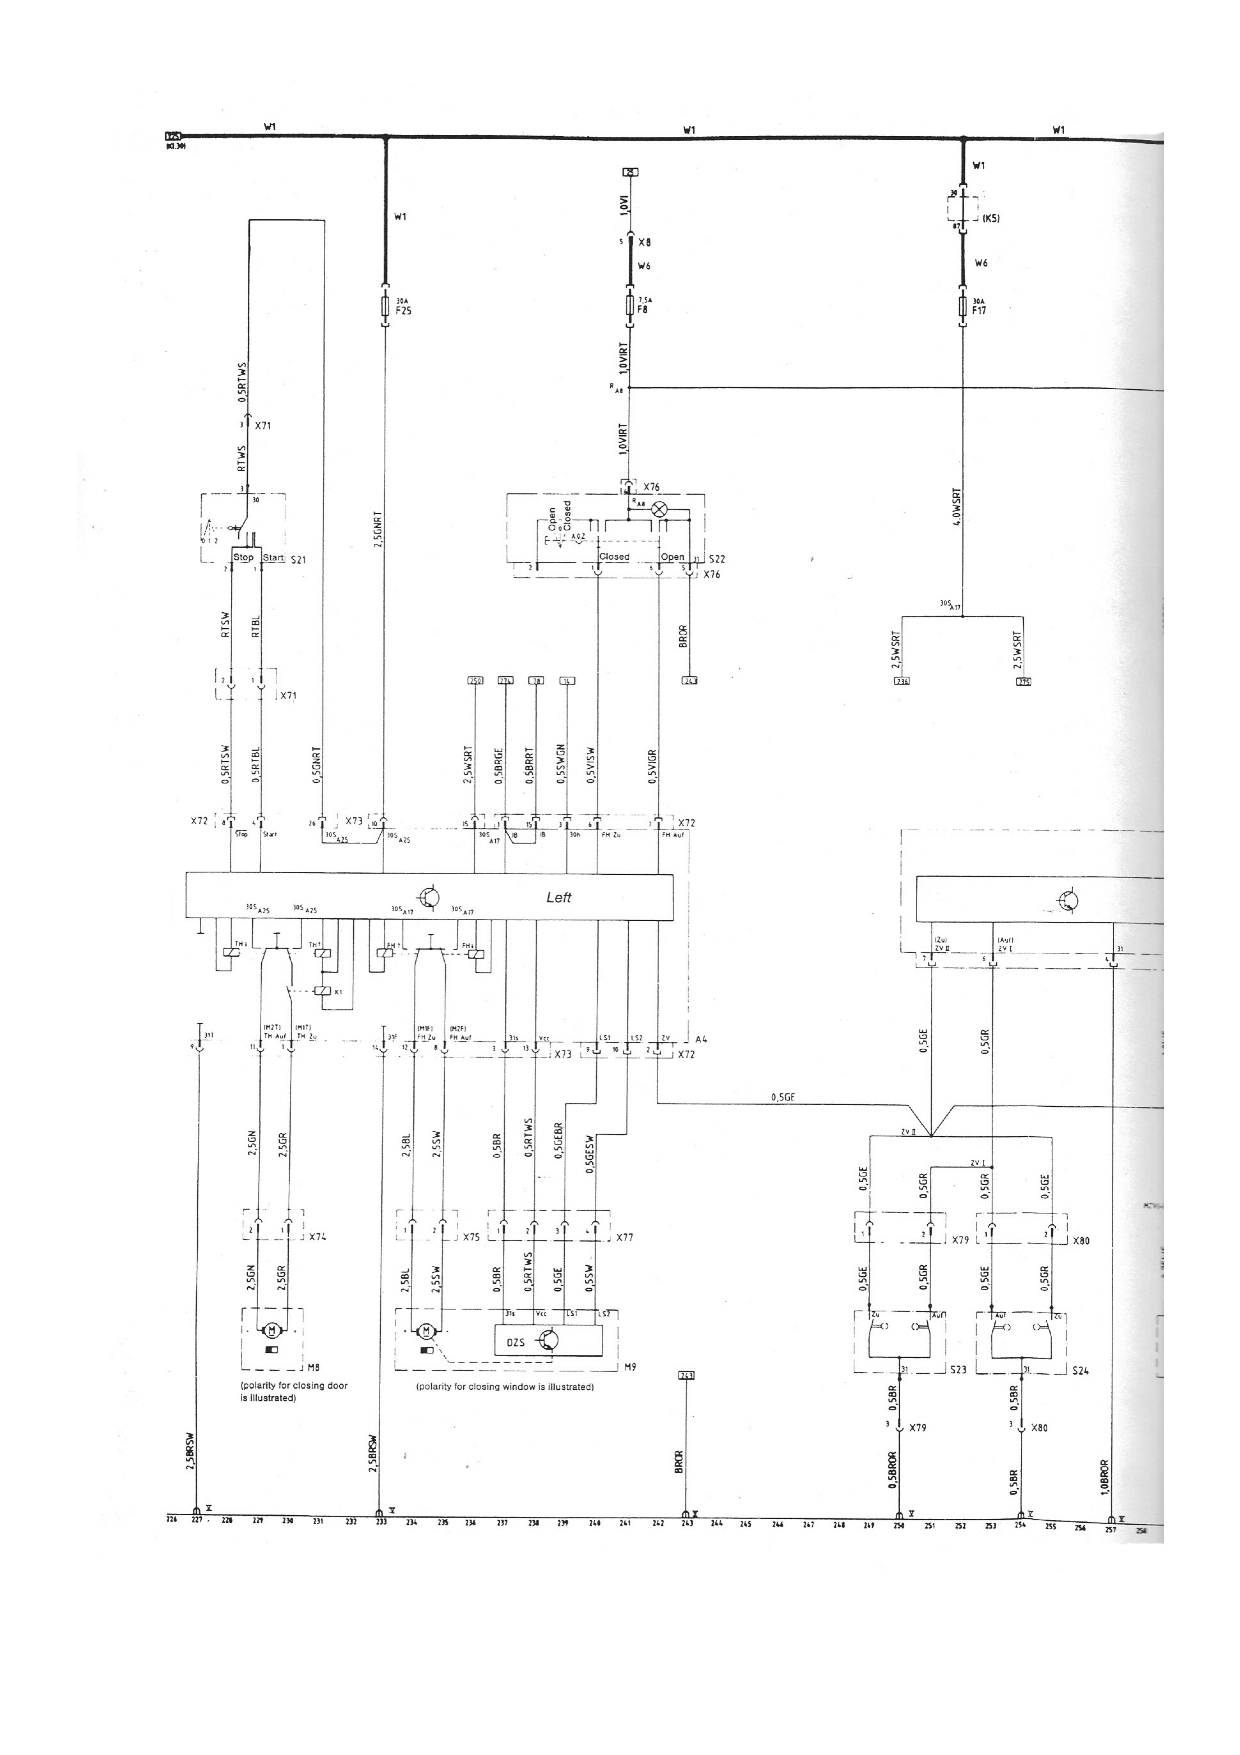
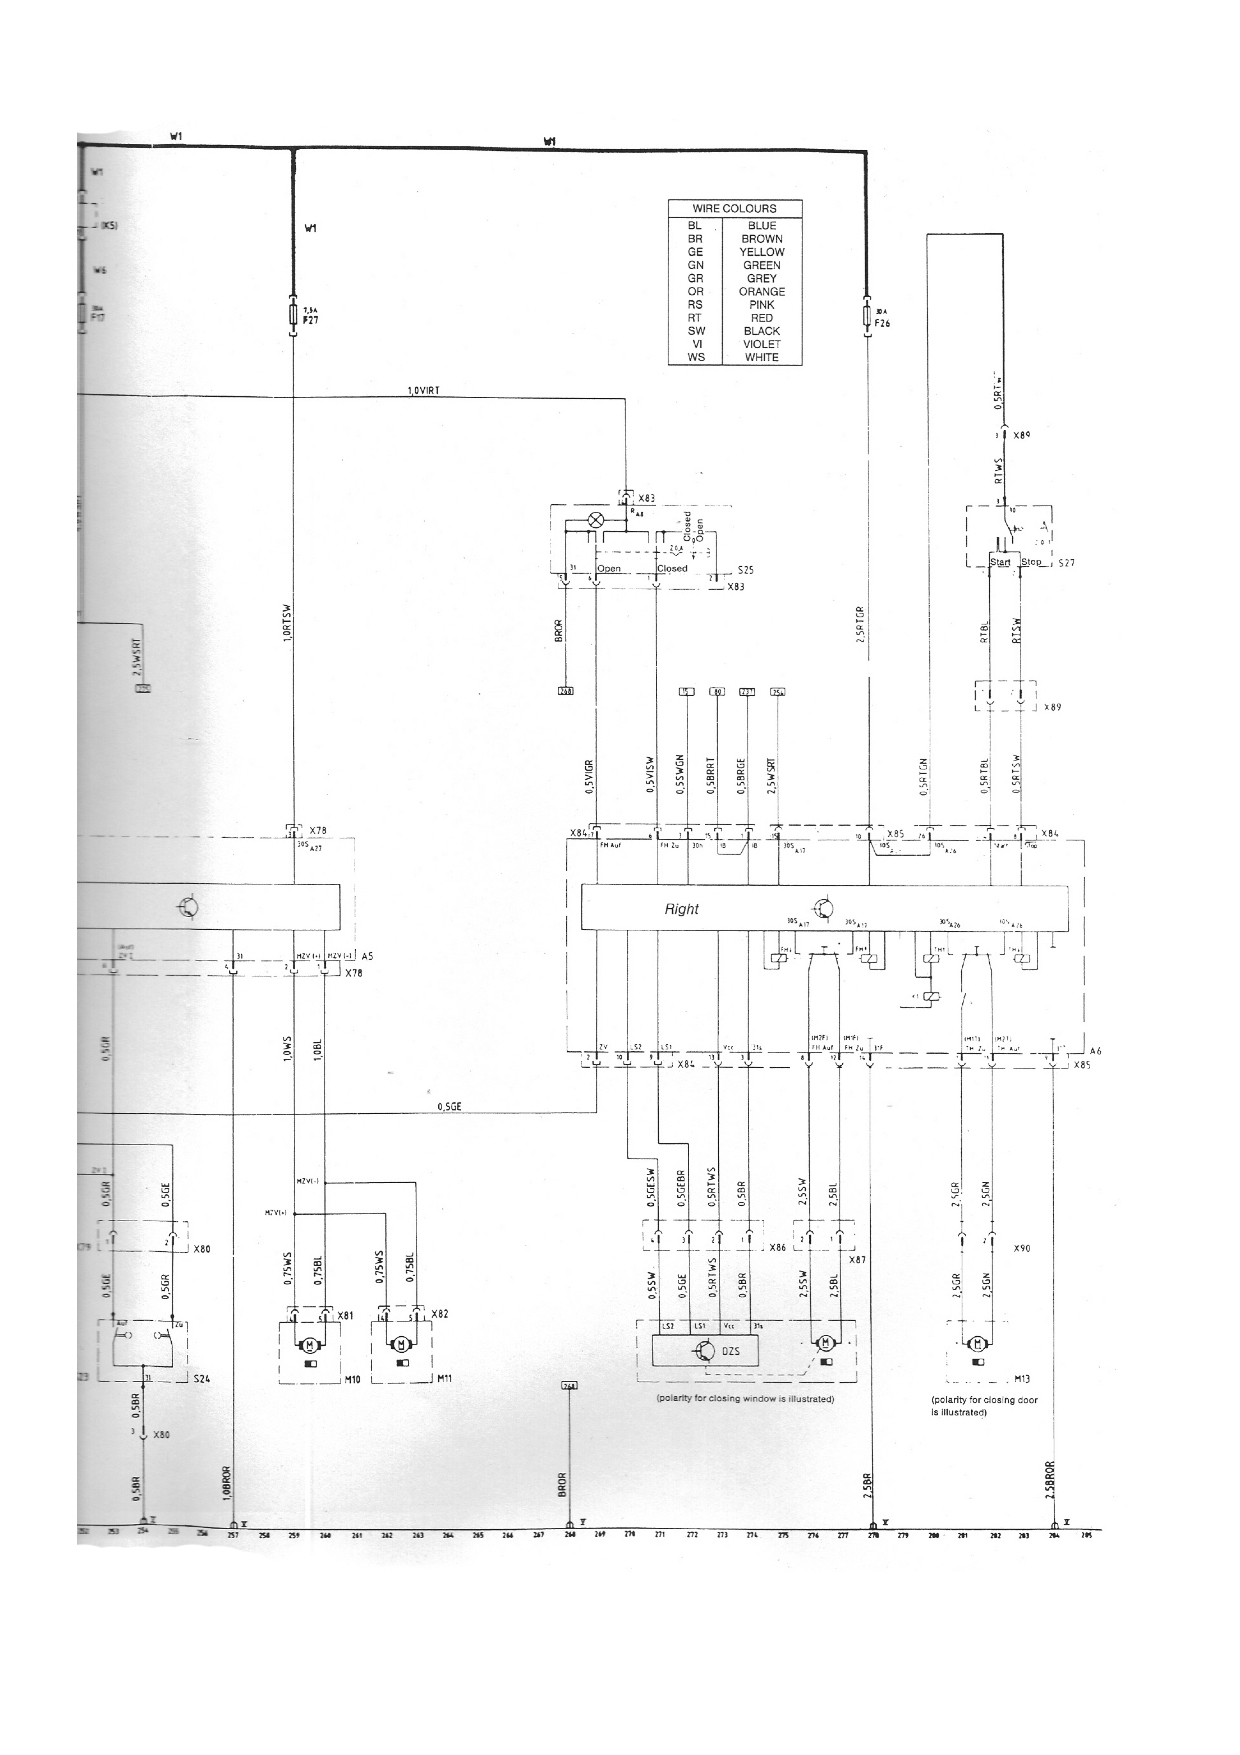
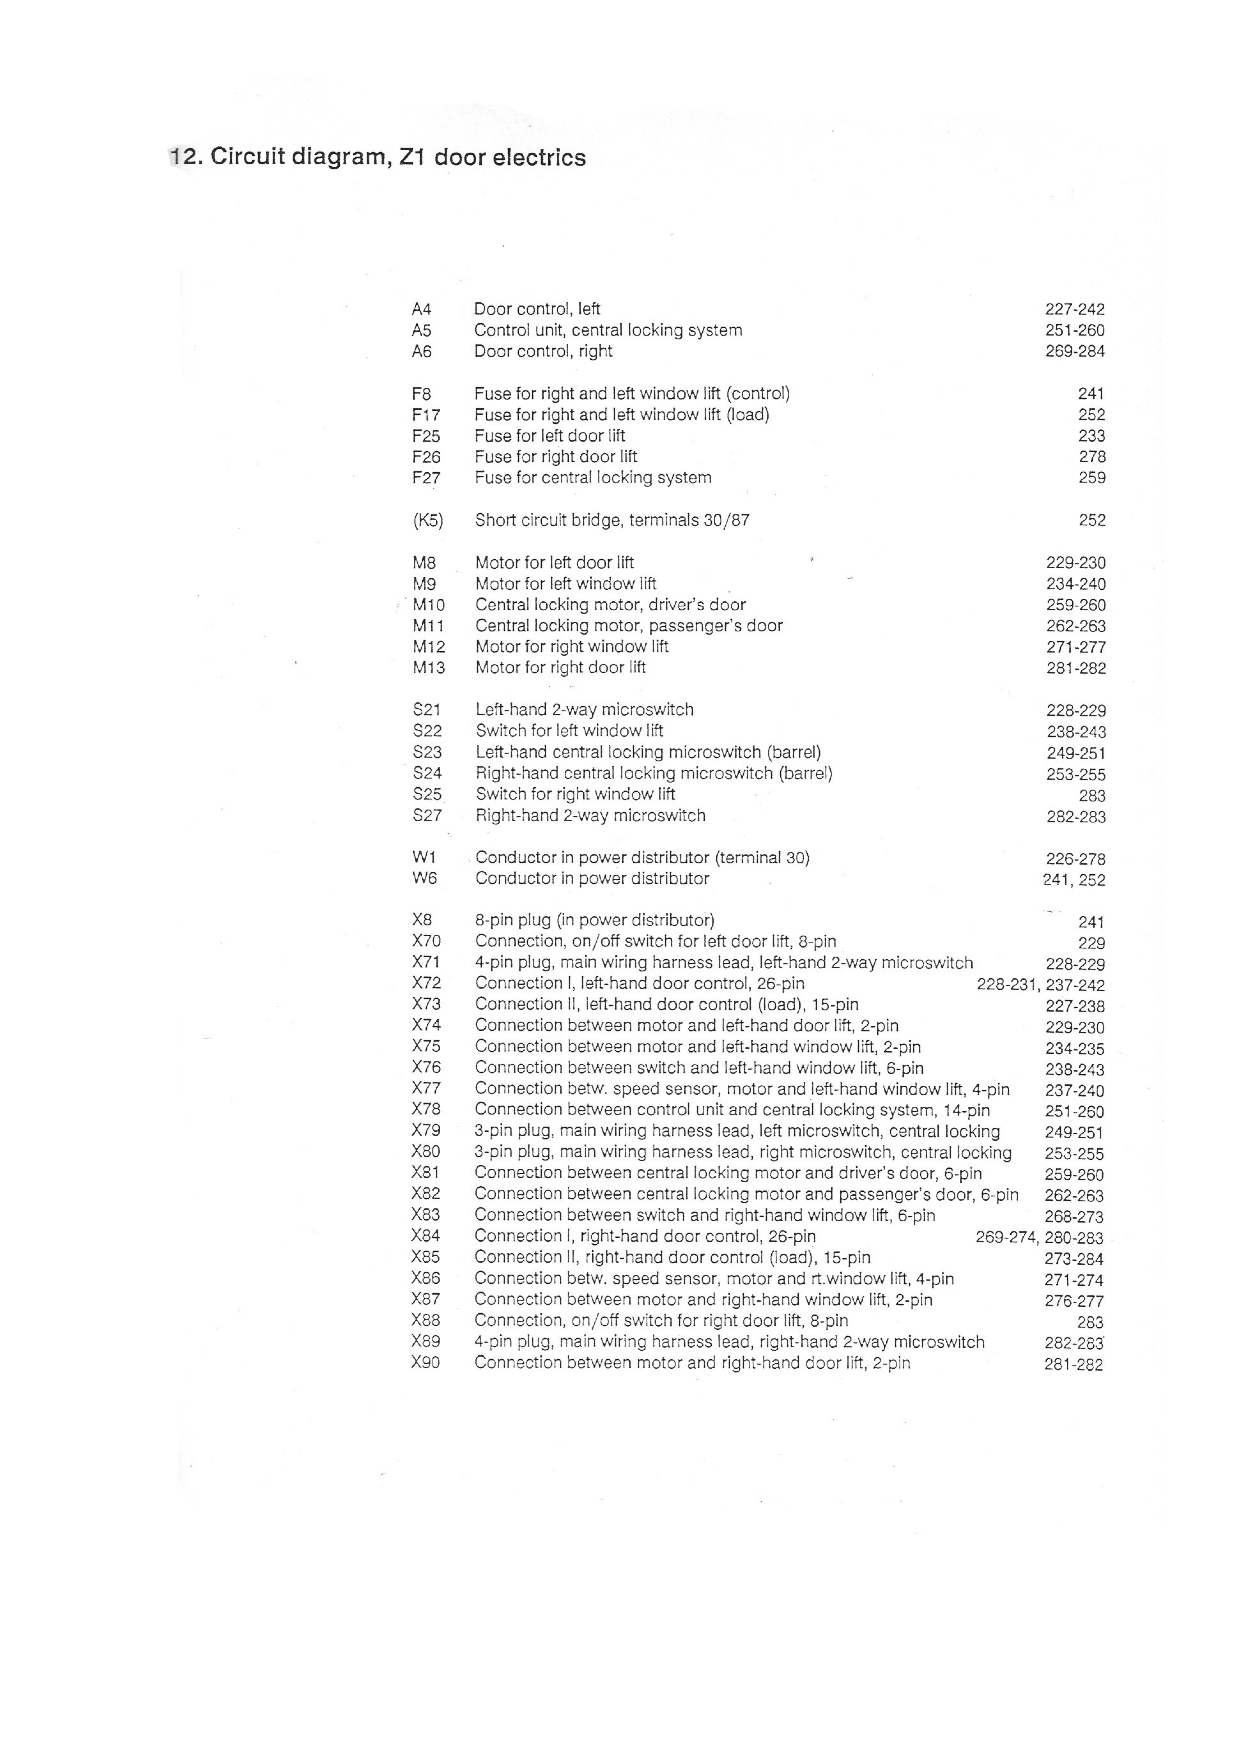
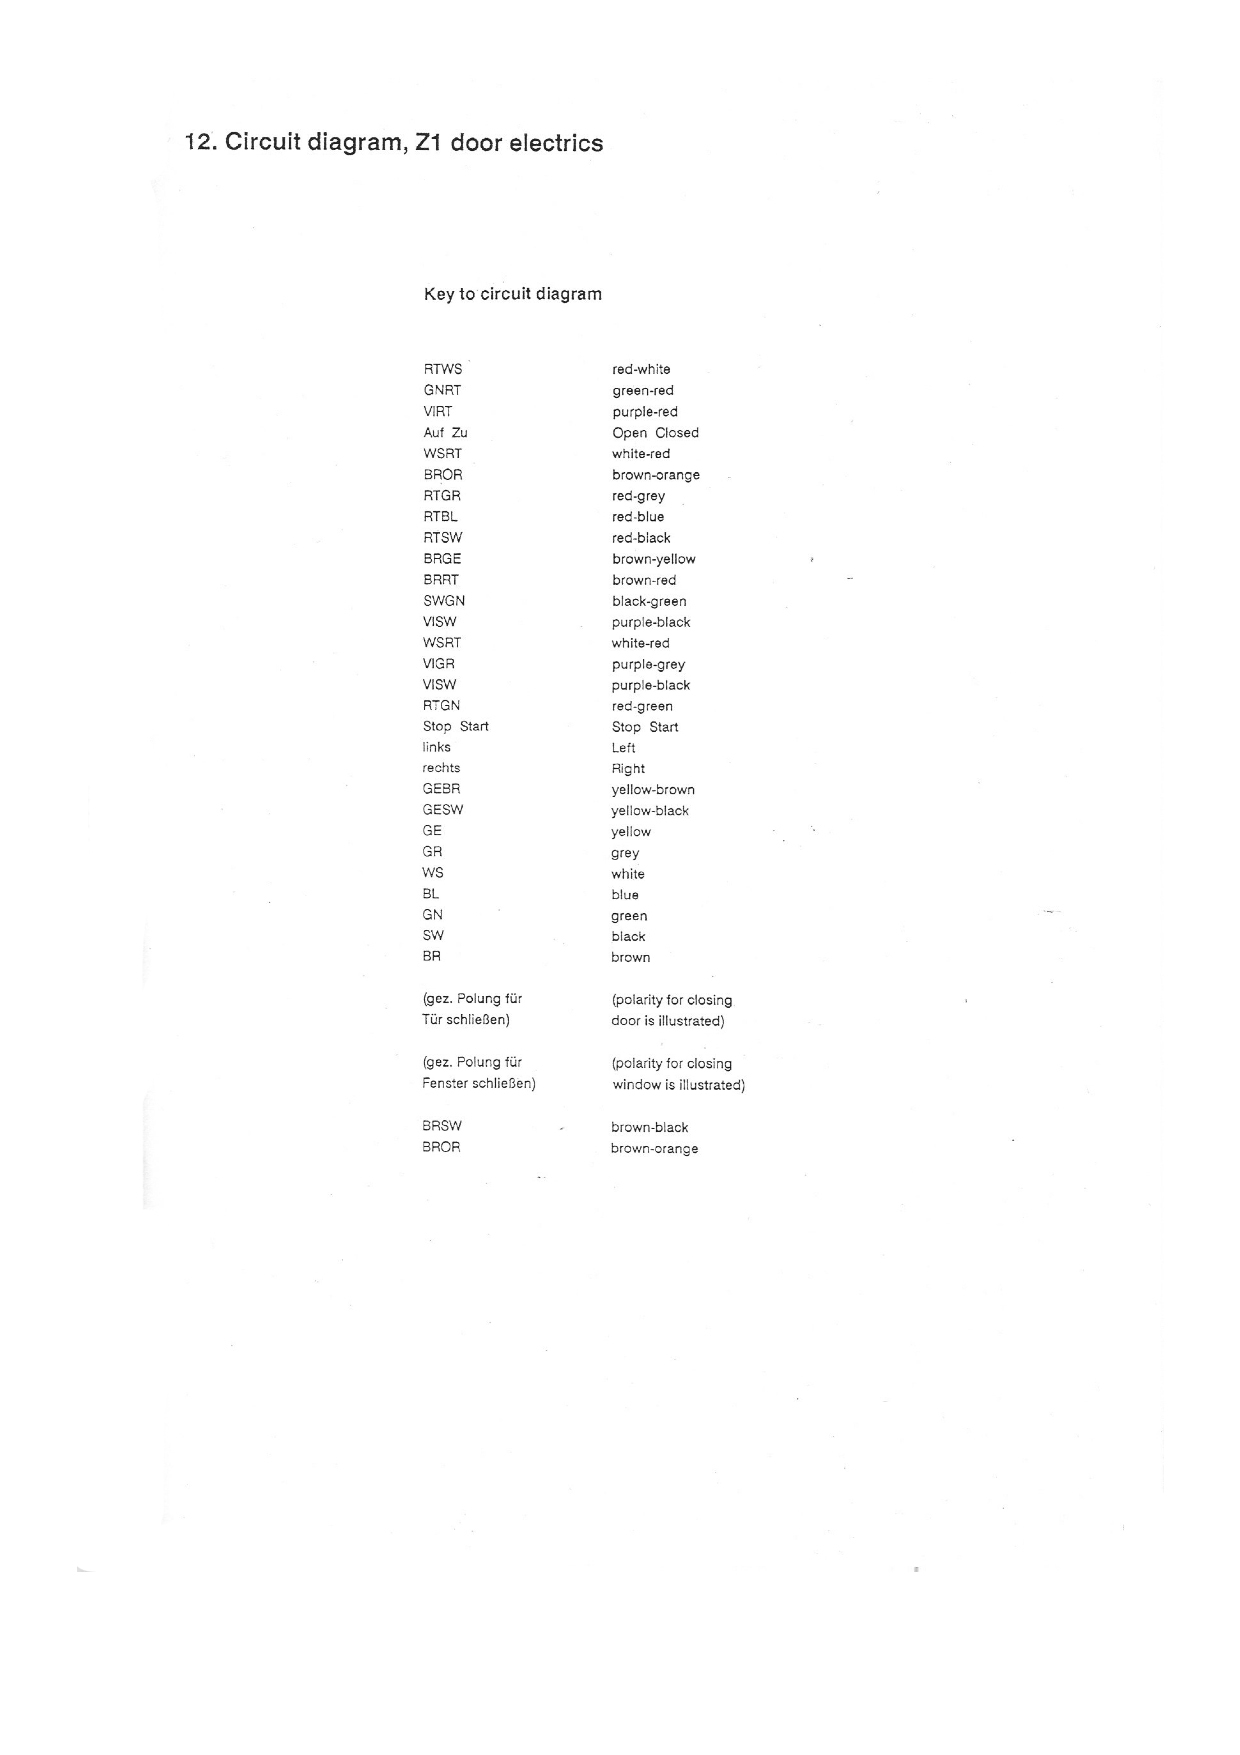
DOOR WIRING DIAGRAMS