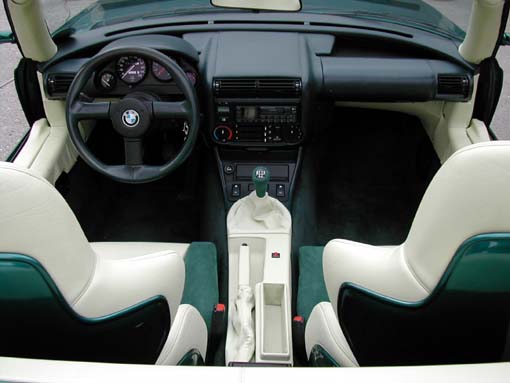
The seats are made up of four basic
components (see picture above). (1)BASE (2) BACK REST
(3) SIDE SUPPORTS (4) LEG SUPPORT.
This can be done with the seats in situ, but for ease of access remove
the seats and seatbelt first.
There are 4x8mm (two either side) screws to the rear and 2x8mm (one either side)
at the front and a 17mm bolt holding the seatbelt to the base.
First remove the seat base. If you feel around underneath
the seat, you will find four T30 Star Key bolts. Three of these are
arranged (left, middle & centre) just under the front of the
base. The final one is located in the centre of the base, this one
is a little trickier to reach.
Once these are undone, you should be able to pull the lower part of the
base forwards, this will expose the rest of the job for your
perusal. The base should now lift out (You will need a slight
upward action as the rear of the base is designed to slot over one of
the metal bars that form the seat frame).
You have now removed two of the four seat components.
Note how the side supports are attached to the seat frame. There are two possible
actions from here, attempt the four bolts holding the backrest in place or remove
the side supports.
You cannot fully remove the side supports as the two are connected behind
the back of the backrest, so move the side
supports to give yourself better access to the four bolts.
Remove the metal clips holding the side supports with a pair of pliers,
don't worry about damaging them as you wont need them.
Once
all the clips are removed the side supports should pull up and hold
themselves out of the way. There is a slight knack to this, in that, the
side supports are located over a metal loop that forms part of the
frame. It is important to pull at the right angle to free the side
supports from the frame.
At this point, take care to notice the metal rods (that have been used
along with the clips) to hold the side support to the frame. There
are two per side and one is longer than the other. Make a note of
which is the front and which is the back. This will facilitate easy
refitting of the side support.
Now you should have good access to the T40 star key bolts (that are holding
the backrest in place). These may be tight. The nuts are
captive, so don't worry about holding these as well. Once the bolts are
undone, you should be able to lift the backrest upwards and rest it on
the cars hood cover and side supports.
Now turn your attention to the removal of the centre console, handbrake and gear lever
assembly.
The gear level simply pulls off, it tends to come off a bit suddenly…
If you remove the rear ashtray, you will note some screws, remove these and that will free the back
of the centre console.
The base of the handbrake gait can now be freed from the centre console,
pull it up as far as it will go over the handbrake lever. The whole
centre console should lift over the handbrake, the gear lever gait can now be easily removed too.
All you should be left with is the handbrake handle and gait. You
will notice that the two are held together (at their joint) by a
combination of tight over wrapped thread and what looks like epoxy resin.
Carefully (always cutting away from you), take a Stanley Knife and cut
away at the threads until all are cut. With a subtle combination of
twisting and pulling these two items should separate. You may be concerned how
you are going to mate the two together again!
|
Refitting is
the reverse of removal, but make note of the following -
1) Make sure you
have half fitted the side supports before bolting the backrest into
place and the seat base goes in last.
2) Be sure to tighten the backrest bolts and seat belt bolts very tight.
These are tight for a reason - yours and your passengers safety.
3) Once the backrest is in, the side supports need to be put back into
place. Re-insert the metal rods and align the back rod with the rod in
the seat frame. I used a combination of tie wraps and locking wire
(that's where the locking wire pliers come in). If you do not have a
pair of these you could
solely use tie wraps. Once the back rod is securely fastened to the seat
frame, repeat the process with the front rod.
4) Before you bolt the seat base back into place, ensure that the metal
clips (on the underside of the seat base are lined up correctly.
Otherwise it will be impossible to tighten the bolts once the seat base
is in place. Also ensure that the seat base is located properly (back of
seat base neatly located on seat frame).
5) The only tricky part on the centre console is reuniting the handbrake
handle and it's gait. I found that if you put them together prior to
sliding the handle down the handbrake shaft - it will then be possible
to secure them with locking wires (minimum four) once in place. As you
then "peel" the gait into place you will have a very neat
join. It might also be worth lubricating the handbrake shaft with light
oil so that the handle slides easily down it. If you have no locking
wire, all I can suggest is the purchase of some stout thread and do the
same as Helmut (or whatever he was called) when the car was assembled at
BMW.
|