HOME- Aerodynamics- Modifications- Specification- Construction- Workshop- Buyers Guide- Owners Manual- ZIKI

LEATHER and NUBUCK

Maintaining Nubuck
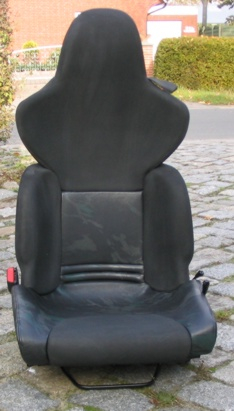
The Lemon and Light grey interiors are not 'Nubuck' and will not need the same treatment recommended here. The dark grey Nubuck seats when exposed to UV fade to A light grey. ALSO NOTE THAT YOU FOLLOW THESE INSTRUCTIONS AT YOUR RISK. For detailed information Click Seat Repair
Cleaning Nubuck
Nubuck gets greasy and compacted if not treated regularly, resembling a waxed leather instead of suede.
The first thing to do is de-grease and clean the Leather. There are several preparations on the market for cleaning suede shoes, carpet and upholstery shampoo sprays seems to work just as well. Follow the instructions on the tin. DO NOT USE soap or conventional leather cleaners, they will make the problem worse.
Try KIWI 'suede and nubuck spray cleaner.
As the suede dries, keep working on the nap to raise the pile, 'rub it up' with something abrasive.
In ascending order of brutality, you can use a hush-puppy brush (copper bristles), or a suede brush (nylon bristles or webbing), pummice stone, or even aluminum oxide paper. Whatever method you use, use a vacuum to remove all the loose bits as you rub them off, and finish off with a proper suede brush to make all the area worked on look the same as the rest of the suede.
If you then retreat with a cleaner incorporating a protective substance (like ScotchGuard) it may help to conserve the work you have done.
The seats will not look good for ever. Depending on use, repeat the procedure.

LEATHER CLEANING (NORMAL)
This guide is based on Gliptone Products, and the instruction is taken from their literature.
Clean First! Do NOT use soap, washing up liquid, shampoo. Gliptone's GT12 is a glycrerine based cleaner. Work it gently into the surface of the leather, leave for a few minutes, re-agitate and then wipe off with a damp (not wet) cloth.
Conditioning. Always clean first! When dry, try Gliptone's 'Liquid Leather' GT11, this is rubbed on sparingly with a soft clean cloth. It does not need to soak in, and the seat can be used after an hour. Very dried leather may need two coats.

DOOR TOP and DASHBOARD
To re-touch scratches and scuffs on the dark grey interior (NOT seats!!) use: Liquid Leather scuff master from Gliptone.
The colour I used was "Alfa Charcoal 90s". Follow the instructions on the box. The sponge applicator supplied is just the right tool.
The match is very good, and as it is a very thin dye, it is easy to blend from treated to untreated. It tends to 'fill in' the natural dimples in the leather, but a re-polish with gliptone leather polish makes it look like new. The dye comes with three additives: A lightener, a darkener, and a gloss enhancer, so you can experiment to get it just right. I did not use any of these. re-finish with GT11 after the dye has dried.

LEMON, RED, LIGHT GREY INTERIORS
Of the four interiors, the Nubuck and camouflage are the most difficult to maintain. If you own any of the alternative combinations, the task is much easier. The Dashboard will either be Dark Grey or Dark Green, the latter only found on cars with THE LEMON Interior. The seats will be a combination of Leather adorning the outer sections and a material for the back support, so normal cleaning techniques apply.

AVAILABILITY
Seat sections have been discontinued for some years by BMW, and the last Seat unit was sold by them in 2010, so restoration is a challenge if the material is damaged beyond repair. There is only one company who sells Nubuck at close to 600 Euros for half a cow, as it is measured, approximately the amount you need for a pair of seats. LOOK AFTER YOUR INTERIOR.

LONGEVITY
Buy or make a set of elasticated colour coordinated seat covers.

Resist the temptation to leave it baking under the sun.

Never sit on the bare seat without some sort of conspicuous cushion or seat protection.

Add Interior to your annual maintenance task.


SUMMARY - DASHBOARD REMOVAL
An assumption is being made that you are competent and comfortable tackling this task or you wouldn't be attempting this. Make a note of where everything goes, what wires plug into where, cabling management etc. Disconnect everything electrical and remove the lower trim pieces in the footwell. There are about 5 screws in either foot well which hold the dash in place, locate them and remove.
On the right there is a circular hole, his is where the dash is bolted to the frame. There is another bolt below this and two on the other side. The upper bolt is accessed by taking out the air vent. The lower bolt is accessed by bending the leather covering. The wires on the right are for the courtesy light and the others are for the speaker under the wire mesh.

The Heater control unit is held in place by two hidden screws, one behind the clock and the other opposite it on the other side, whilst the actual heater is held in place by hex screws visible from the front.

The drivers side is a little more complicated with more wires to disconnect. The instrument panel comes out easy, its shroud is held in place by 3 screws and the instruments by long hex bolts you can see from the front and the speed just unplugs. Again, on the left you can see one of the dash bolt holes.

The steering wheel bolts on to the steel rod which goes horizontally across behind the dials, the radio and curved leather piece in front of the passenger. The steering wheel drops down so you need to take it off, the entire dash can be rotated out gently (!!!), its not heavy.
There is not much left once the dash is out, the various sections of the dash riveted and bonded together so cant be separated in-situ. Once out, do the reverse of removal and hopefully you took the liberty of noting how and where everything is plugged in.