BODYWORK
PANEL REMOVAL.
The composite body panels are attached to the car by 'forks' cast into the inside of the panel which locate over a rubber mounting shaped like a cotton reel. Each panel slides fore and aft to locate onto the rubber mountings, and is then secured by a series of dome headed 'torx' bolts, each with a rubber washer. This method of fixing allows the panels to move as they expand and contract with changes in temperature.
To remove each panel, undo all torx dome bolts and any self tappers, then slide the panels off. Front wing comes off towards the front, and the rear wing and lower sill panels slide towards the rear. There should NOT be any need to adjust or undo any of the rubber mountings.
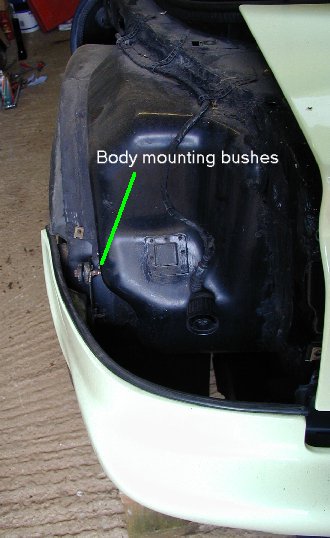
| REAR VIEW: This shows the rear LHS wing removed.
You can see the wiring and harness for the rear light. The next picture shows the details of the body mounting bushes |
|
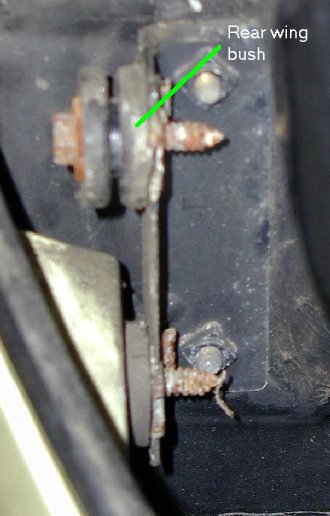
| This is a close up of the 'cotton reel' rubber bushes. The upper bush is empty, as the rear wing has been taken off. The lower bush shows the panel 'fork' with the rear bumper in place.These bushes should not need adjustment, or undoing. The body panels slide into the gap in the bush. You can see that the middle groove in the top empty bush is shiny where the rear wing 'fork' was fitted. Lubricating the bushes before re-fitting the body panels will make life easier later. |
SIDE PANEL REMOVAL
Unscrew bolt from rear of front wheel arch and lift the flexible wheel arch liner over the front edge of the side panel. Unscrew the 5 screws underneath the side sill, and the 3 fittings at the rear of the engine compartment undertray.
Gently pull out bottom of panel to clear the jacking points. Do NOT pull too far, else you will rip off the 'fork' guides, it is best if you keep a hand on the front, upper part of the panel which is under the front wing. This is where the 'forks' are and will help prevent undue strain.
When the lower part of the panel is free, slide it rearwards, after about 40mm it will be free of the forks and off the car.
Lubricate the rubber bushes (Petroleum Jelly).
REAR WING REMOVAL.
Remove rear light assembly. With a small screwdriver, press in the two stainless clips visible through the holes in the light unit viewed from the side of the unit when the boot is open. Undo the electrical connector and place the unit aside.
Remove 3 clips from rear wing to rear bumper joint (These are often missing). These clips hold the two panels close together, and are a pain to replace. I have small pair of self gripping pliers which I use to hold the two panels together and then can spring the clips back on - the flat side is down wards. The rear two clips are accessed from the tail-light hole, and the front one is under the rear wheel arch.
Shut boot lid, and raise top cover. remove three top dome headed bolts.
Shut top cover, open boot lid. Remove three bolts and the self tapping screw which secure the inside edge of the rear wing to the side of the boot. You should put your hand inside the lamp unit hole to counter-hold the nuts.
Lower the door and remove the bolt on the front edge of the rear wing. This is visible through the brushes at the rear of the door opening.
Gently lift top of rear wing panel over the door lock button, and slide panel off rearwards.
Note! with the right hand rear wing, you will have to remove the petrol filler cap, and disconnect the filler drain from under the wing.
When re-assembling lubricate rubber bushes, and take care to re-fit the door lock grommet properly. There is a plastic retainer for the inside edge of the rubber surround.
WING FRACTURES
20 Years on and more owners are experiencing stress fractures with the front wings. It appears this is caused by a combination of wear and tear, age, stress and to a lesser degree the rubber grommets at the mounting points degraded